How I set up a Cisco Linksys e2000 N router to work with a Westell 6100 modem router.
In order to use the Linksys router with the Westell 6100 modem/router, you first must change the Westell modem to bridge mode.
To change the Westell 6100 modem to bridge mode, do the following:
1. Connect the Westell modem to a computer by the Ethernet cable.
2. Open a web browser and enter 192.168.1.1 in the address bar. This is the IP address for the router.
3. You may need to enter your Westell 6100 username and password. Note that the default username is admin and default password is password.
4. From the main menu, click My Network
5. Click Network Connections in the left panel.
6. Click broadband Connection (DSL)
7. In the VCs section, click the Edit icon
8. Select Bridge in the Protocol field
9. Select Bridge in the Bridge Mode field
10. Click OK or Apply. You may get a warning screen reminding you that your modem must be reset. This will be automatically done.
11. The modem will now reset itself. Once it resets, the modem will take you back to the main menu. Click Main if the Main page does not display automatically.
12. Click Network Connections in the left panel
13. Click on LAN
14. Remove the checkmark from the Private LAN DHCP Server Enable box
15. The Westell 6100 modem is now in Bridge Mode. Close the Westell 6100 configuration window.
16. Shut down computer.
17. Unplug the power to the Westell 6100 modem.
18. Unplug the Ethernet cable from the back of the Westell 6100 modem and plug it in the the Yellow port on the Linksys e2000 router.
19. Now, take a new Ethernet cable and plug one end into the back of the Westell 6100 modem and the other end into one of the numbered ports on the Linksys e2000 router.
20. Plug the power supply for the Linksys e2000 router into the 110 volt wall outlet.
21. On the Linksys e2000 router, press and hold for 1 minute the reset button on the back of the unit. Use a ball point pen to do this.
22. Now, unplug the Linksys e2000 router.
23. Reconnect the power to the Westell 6100 modem, Wait one minute.
24. Then reconnect the power to the Linksys e2000 router.
25. Turn on the computer.
26. Insert the Linksys e2000 setup CD and follow the onscreen instructions.
27. When the setup process has completed, you should see a window displaying the name of the wireless network, the password to get into that network, the name of the guest account, and the password to get into the guest account.
28. Write down all of the information in step 27.
29. Now you should be able to connect to the wireless network using the name and password from step 27
Monday, March 28, 2011
Monday, February 21, 2011
Setting up Mozilla Thunderbird with Frontier.com
Open Mozilla Thunderbird

Click on Tools (1)
Open Account Settings
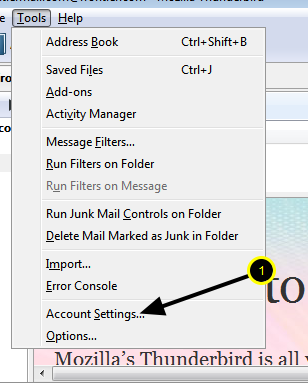
Click on Account Settings in drop down menu (1)
Account Settings Dialog box will apper
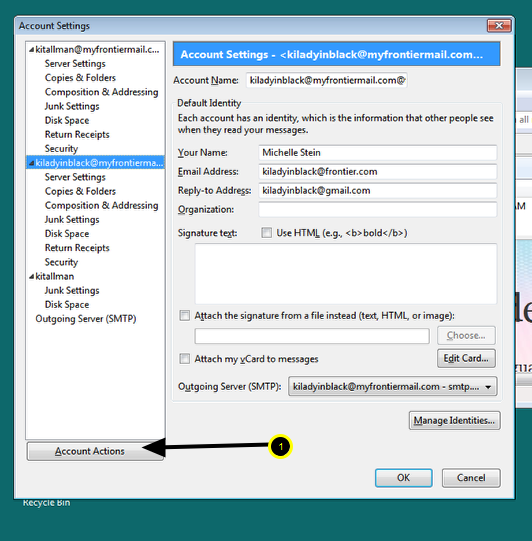
Click on Account Actions (1)
Account Actions dialog box will appear
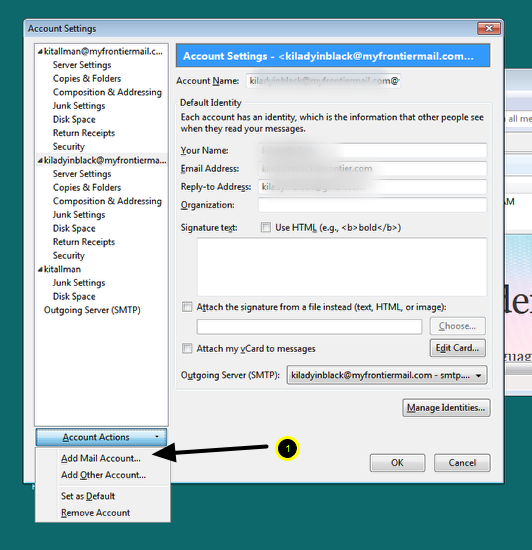
Click on Add Mail Account 91)
Add Mail Account dialog box will apper

Entire real name here (1). Enter Frontier email address in this format: username@frontier.com (2). Enter Frontier password
This is how dialog box should look after entering above information
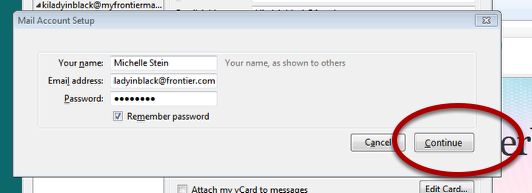
Click on the Continue button
The mail account setup window will verify your information
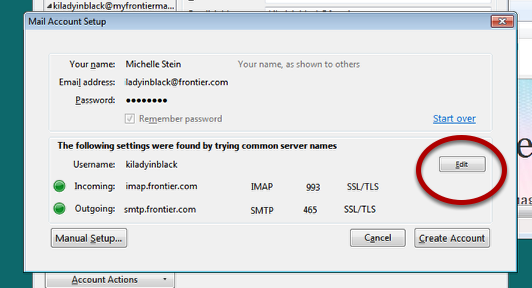
Wait until program completes its verification, then click on the Edit button
After clicking on Edit button, the dialog box appears
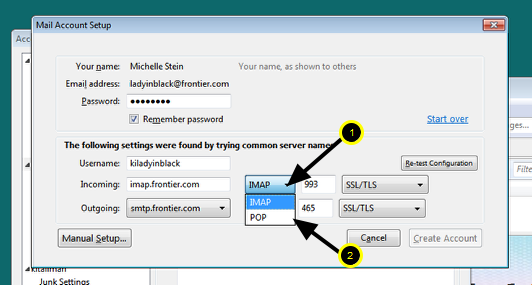
Click on the box that reads IMAP (1). Then select POP from the dropdown menu (2)
After selecting POP, this dialog box appears.
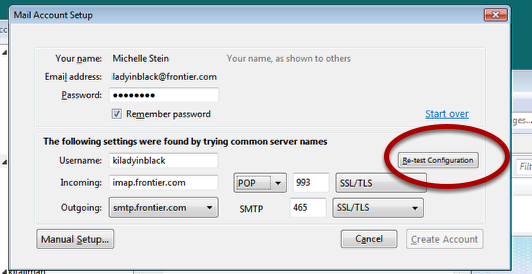
Click on Re=test configuration.
After program retests the configuration, this dialog box will appear
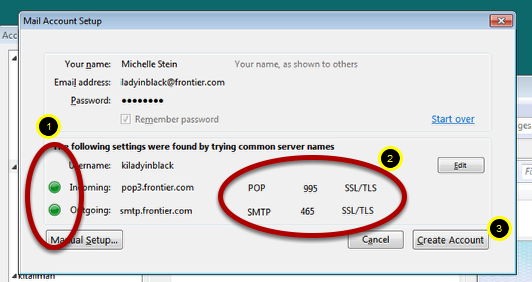
Make sure both radio buttons in step (1) show green. Also, make sure the information in step (2) matches the information shown above. Then click on Create Account (3)
After click on Create Account, this dialog box will appear
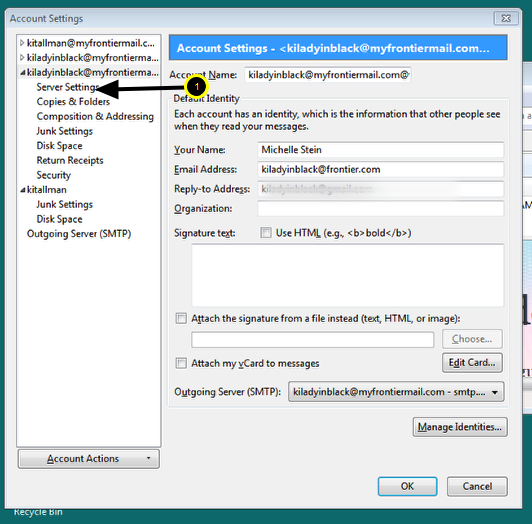
Click on Server Settings (1)
The Server Settings dialog box will appear
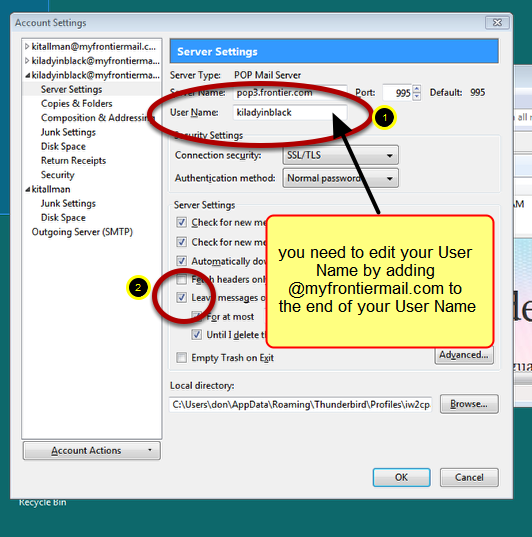
Edit User Name (1). In the above example, the edited User Name will look like this: kiladyinblack@myfrontiermail.com. Also, click on the box in (2) to remove the check mark.
Dialog box after editing your User Name
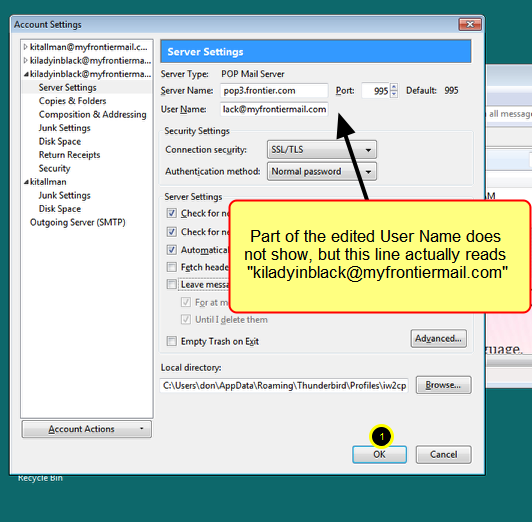
This dialog box shows the edited User Name. Click on the OK button (1)
After clicking OK, you will be returned to Account Settings dialog box
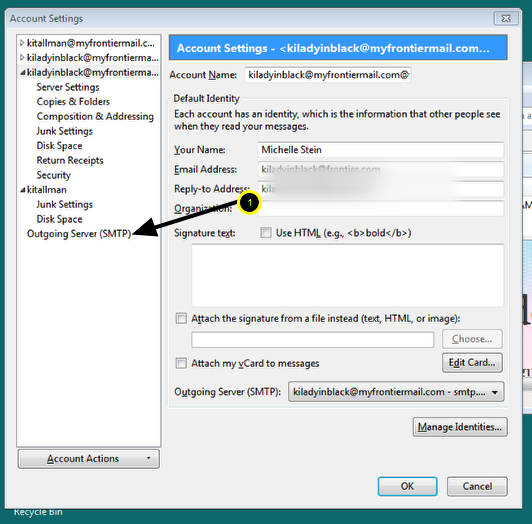
Click on Outgoing Server (SMTP) (1)
Outgoing Server (SMTP) Setting dialog box appears
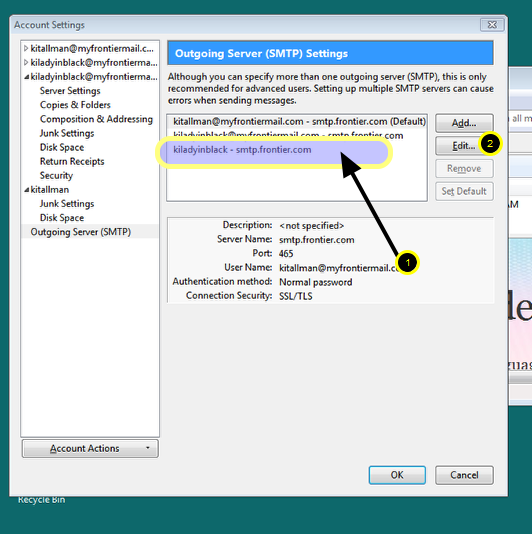
Highlight the entry that DOES NOT have the "@myfrontiermail.com" added to the User Name (1). Then click the Edit button (2)
The edit SMTP dialog box appears.
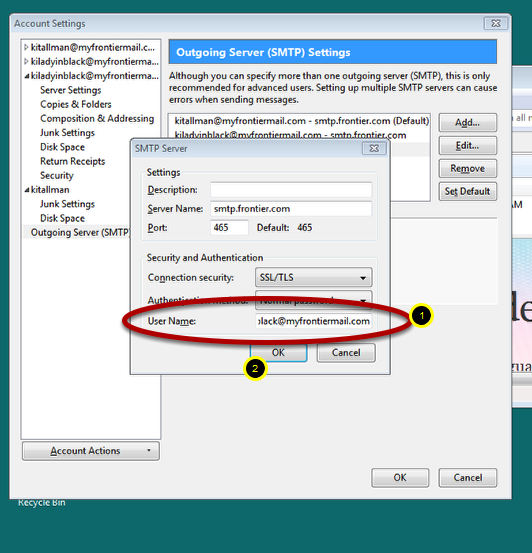
Edit your User Name to add "@myfrontiermail.com". (1) In this example, it looks like "kiladyinblack@myfrontiermail.com". The click on OK (2)
The edited SMTP Settings dialog box will appear
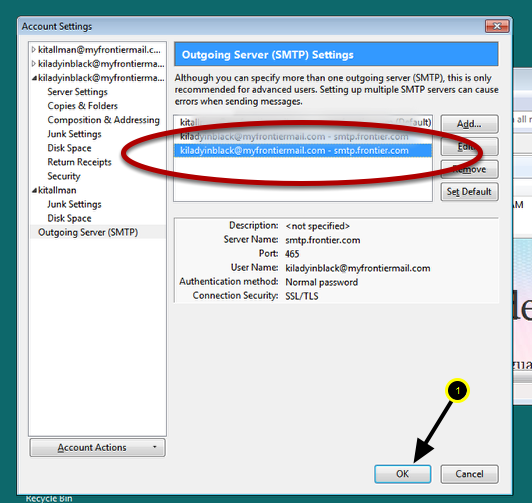
Make sure the entry looks this this. If not, edit again.Then click OK (1)
At this point, you should be fully set up to send and receive email from your Frontier.com account
How to transfer photos from email to Picasa
This lesson explains how to transfer photos from your email inbox to Picasa. It assumes that you are using Windows 7, Firefox, Gmail, and Picasa. Follow these steps below a few times and the process should become easier. Keep this lesson for future reference.
Open Computer Window by clicking on the Start Orb, then Computer
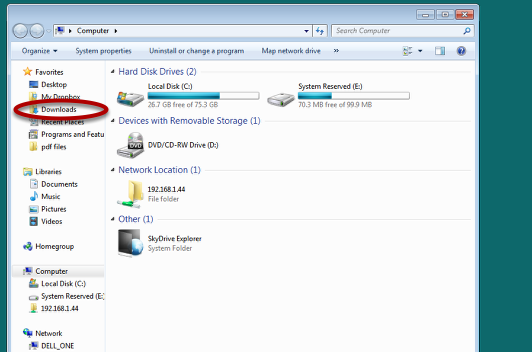
Now, click on the Downloads item on the left of the Computer Window screen
You are now in the Downloads folder. You screen will be different than the one shown below. Just make sure it reads Downloads in the address bar.

You want to create a new folder in the Downloads folder for a place to put the photos from your email inbox. To do this, right click on a blank area of the Downloads folder, then select New, then Folder. A new folder will be created and will be highlighted with the temporary title of "New Folder". Simple rename the folder at this time by typing a new name. If something happens that you didn't type a new folder name and it shows as New Folder, just right click on it and select Rename and type a new name.
Let's name this folder Email Pics for this lesson. You can name it anything you want.
The new folder called Email Pics has been created in the Downloads folder.

Now we are ready to download and transfer the photos from your email to Picasa. We will be using this new folder call Email Pics as a temporary storage area before adding to Picasa
The image below shows some photos that are in my email inbox in gmail. You see that we can either View or Download each image.
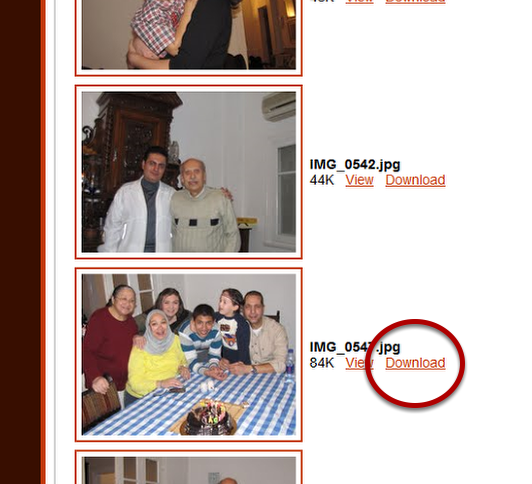
What you want to do is to click on Download. This will download the image to your Downloads folder. After downloading all the images you want to transfer to Picasa from your email, go to the next step below.
The download window within Firefox. Yours will vary, but the image you just downloaded will always be on the top of the listing.
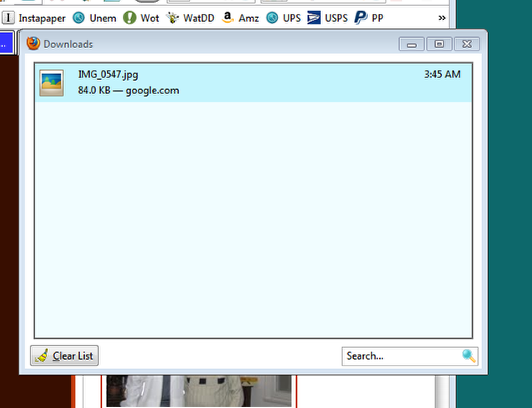
Continue downloading all the images that you want to transfer to Picasa in the same manner as above. When you have downloaded all the images you want to transfer, go to the next step. In this lesson, I am only downloading and transferring two (2) images. Note that the Firefox downloads window my not show after the first image is downloaded.: that's because it is under another window. Don't worry, the image is still being downloaded.
Here you see the Firefox download window with two images downloaded.

Let's say we are done. Now we will open ;the Downloads folder where the images were downloaded to. To do this click on Start Orb, then Computer, then Downloads. This is exactly like we did at the beginning of this lesson.
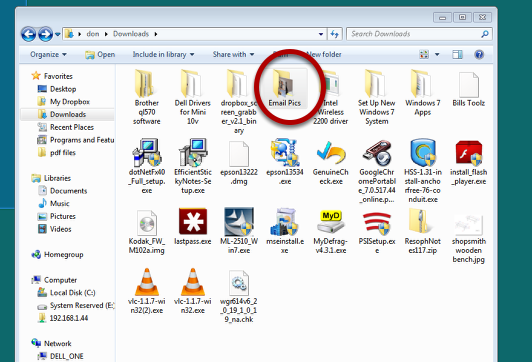
Here is the Downloads folder showing the Email Pics folder that we created and the two images that we downloaded from our email inbox.
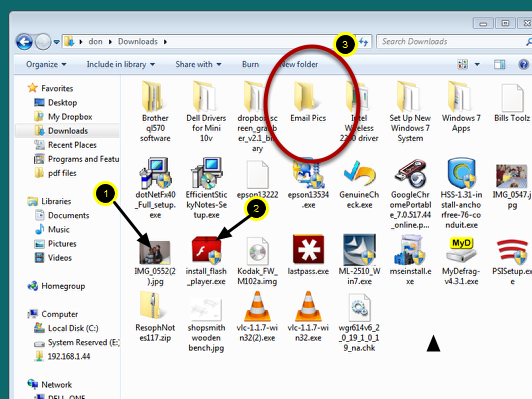
1. First image downloaded. 2. Second image downloaded. 3. The folder we created.. Now we need to move the downloaded images to the Email Pics folder. To do this, point the mouse to one of the images and press and hold the left mouse button and drag the image on top of the Email Pics folder. This will move the image to that folder and it should disappear from the the Downloads folder.
Drag and drop images to the Email Pics folder
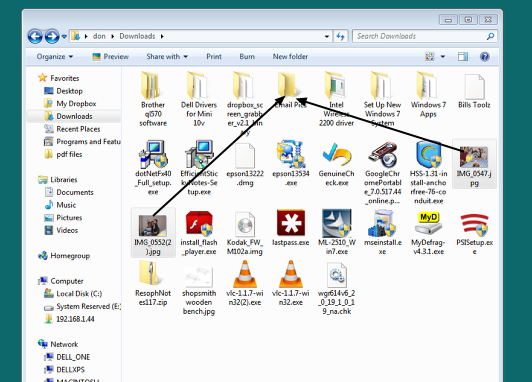
Here the images have been dragged and dropped onto the Email Pics folder. You can see they no longer appear in the Downloads folder.
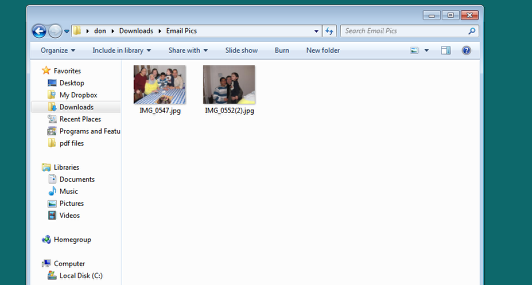
You can verify that your images have been moved to the Email Pics folder by double clicking on the Email Pics folder. The Email Pics folder will open and show the images you moved to that folder as shown in the step below.
Here you see the Email Pics folder opened and showing the images we moved to it.
We now have all our images that we want to transfer in the folder named Email Pics. But they have NOT yet been transferred to Picasa. This will be done in the next step.
We need to open the Downloads folder again. It may already be opened, but if you have several windows opened and are confused, then simple close all windows.
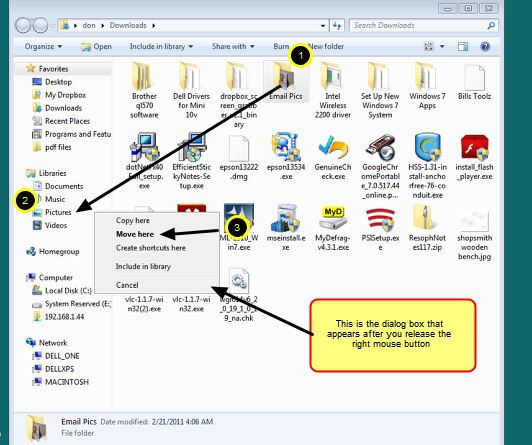
Open the Downloads folder by clicking Start Orb, then Computer, then Downloads. When it appears on you screen, do the following to transfer the images to Picasa.
(1) Point mouse to Email Pics folder and press and HOLD the right button.
(2) While still HOLDING the right mouse button, drag the Email Pics folder on top of the item named Pictures on the left side of the window
(3) The word "Picture" should become highlighted. When It is, release the right mouse button. The dialog box will appear. Now left click on move here.
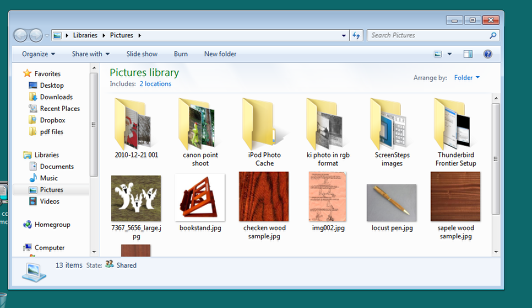
What you have done by completing the three steps is to move the Email Pics folder to your Pictures folder. Picasa monitors the Pictures folder and when any images are added to the Pictures folder, it will automatically and magically add the images to Picasa. Better than swinging a rubber chicken over your head.
Saturday, January 15, 2011
Network printing problem solved
How I solved the network printer problem between the Dell XPS laptop and the Dell One Desktop.
The Situation:
I have a Brother HL-2140 b/w laser printer attached to a Dell One desktop via a USB cable. The printer works fine from the Dell One. I have a home network that works fine. I want to be able to print from my Dell XPS laptop to the Brother printer via my wireless network.
The Problem:
Every time I shut down and restarted the XPS, I could not print to the Brother HL2140 printer
If I reinstalled the network printer in the normal manner, I could print.
How I solved the problem:
- Rebooted the XPS laptop
- Tried to print a test page, but it would not print
- I then exported the services.msc file as a CSV file BEFORE reinstalling the printer.
- Next, I reinstalled the network printer and tried to print a test page. Two test pages were printed: the first attempt and the second attempt printed.
- I then exported the services.msc file as a CSV file AFTER reinstalling eh printer.
- I printed both files that I exported.
- I then compared both files to see the difference.
The only difference was one line item on the AFTER file that was NOT on the BEFORE file.
The line item name was:
Diagnostic System Host.
When I opened the Services file AFTER reinstalling the network printer, this line item was set to Manual. I changed it to Automatic, saved the file and rebooted the XPS.
Then I tried to print a test page and I was successful
Saturday, January 8, 2011
How to copy one or more photos to Dropbox.
This lesson will explain how to copy one or more photos from a Windows PC to your Dropbox. It assumes you already have a Dropbox account. If not, go to www.dropbox.com and sign up for a free account. This lesson further assumes you are copying photos from your Pictures folder on the Windows computer.
To copy one photo from Pictures folder to Dropbox folder

Open your Pictures folder by clicking on Start (1) then Pictures (2)
Your Pictures folder will open
Now, let's open your Dropbox folder
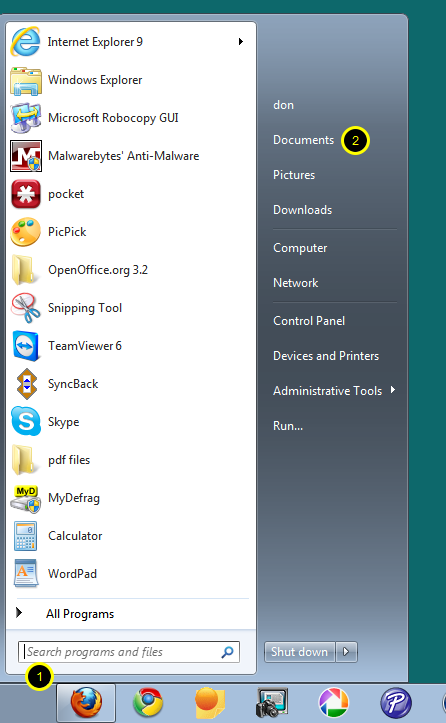
To open Dropbox folder, click on Start (1), then click on Documents (2)
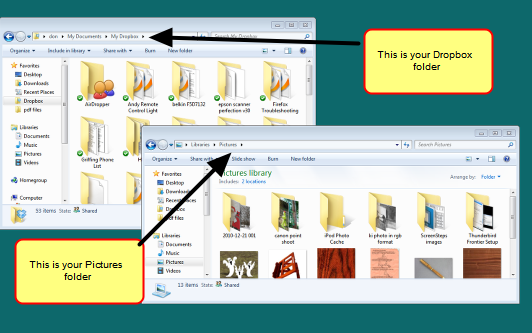
Your Documents window will open as shown below

To open your Dropbox folder, left click on "Dropbox" in the upper left section of the Documents window
Now both your Pictures window and your Dropbox window will be on your Desktop
To copy one photo at a time
Now with both Windows on your Desktop, point your mouse to a photo in your Pictures folder that you want to copy to Dropbox, then right click and then left click on "Copy" from the drop down menu.
Now, point your mouse to the Dropbox folder and right click and then left click on "Paste" from the drop down menu.
You have just copied one photo to your Dropbox folder.
To copy multiple photos from your Pictures folder to your Dropbox folder
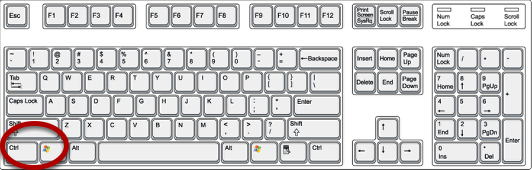
While holding down the "Ctrl" key, point your mouse to each photo in your Pictures folder that you want to copy to your Dropbox folder.
Clicking on multiple photos
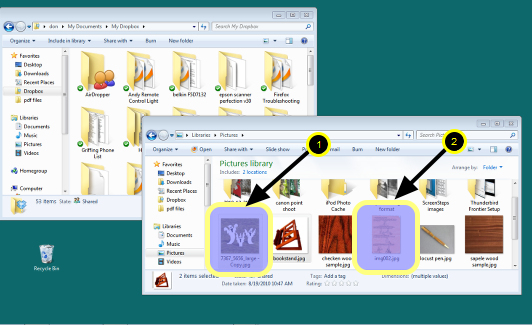
While holding down "Ctrl" key, left click on first photo (1), then second photo (2). If you want to copy more phots, simply continue left clicking on more photos, while still holding down the "Ctrl" key.
Now, release the "Ctrl" key and point your mouse to any one of the multiple photos selected and right click and then left click on "Copy" from the drop down menu.
Now point your mouse to your Dropbox folder, then right click and then left click on "Paste" from the drop down menu.
You have now copied multiple photos to your Dropbox folder
Wednesday, December 22, 2010
Setting up a Remote Connection
Set up remote computer for using Team Viewer
Visit Team Viewer Website

Open Firefox and enter www.teamviewer.com in the address bar as shown above; then press the Enter key.
Now you will be at the Team Viewer website
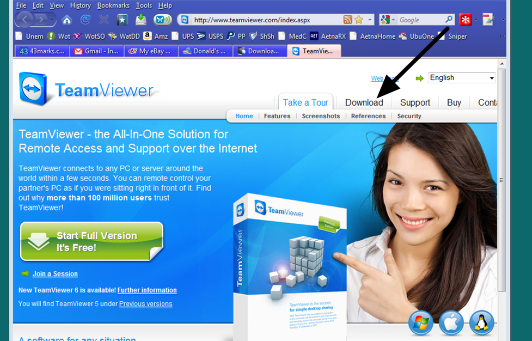
Click on Download link as indicated by the arrow.
After clicking on "Download" you will be at this page.

Move down this page until you get to the following screen
Mouse down the page until it arrive at this section of the page
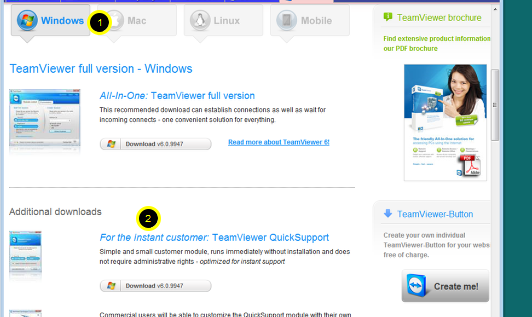
Make sure that "Windows" tab is selected (1). Then click on the link "for the instant customer TeamViewer Ouick Support" (2)
This window will appear next.
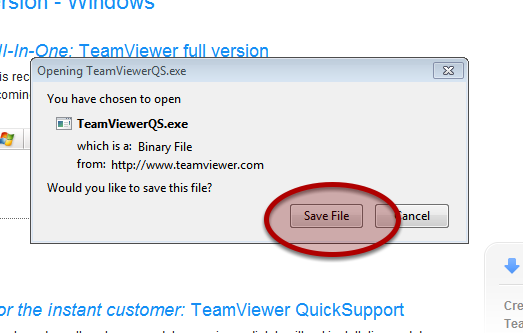
Click on the Save File button
Firefox Downloads window will appear

Wait for the download to complete. The first entry should be "TeamViewerQS.exe". You may have several entries in this downloads window.
Double click on the TeamViewerQS.exe line as shown above.
Double click on the TeamViewerQS.exe line as shown above.
After double clicking above, this window will appear
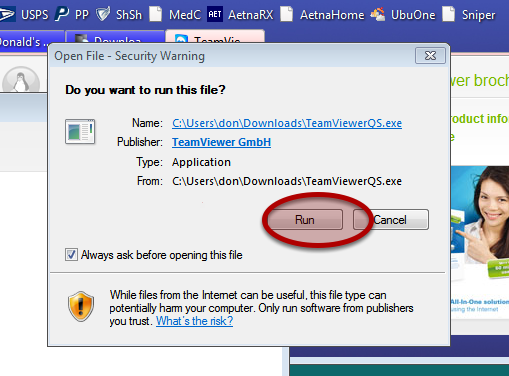
Click on "Run"
Windows security window may appear. If it does not appear, skip to the next step.
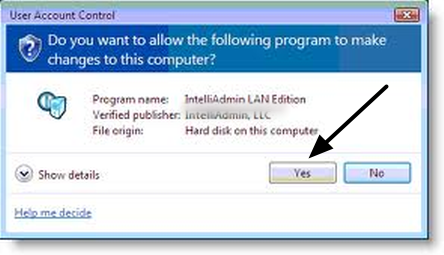
If this window appears, click on "Yes" to continue. If it does not appear, you should be at the next step.
After the program installs, this Team Viewer Quick Support window will appear.
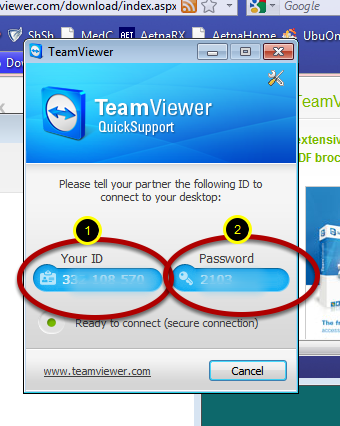
In order for me to connect to your computer, I need both the "Your ID" number (1) and the "Password" number (2). These can be emailed to me or you can phone me with the information
Updating Firefox
How to check version and download new version of Firefox
Open Firefox
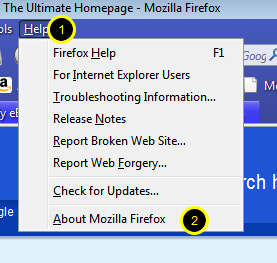
Click on Help (1). Then Click on About Mozilla Firefox (2)
This will be the next window that appears
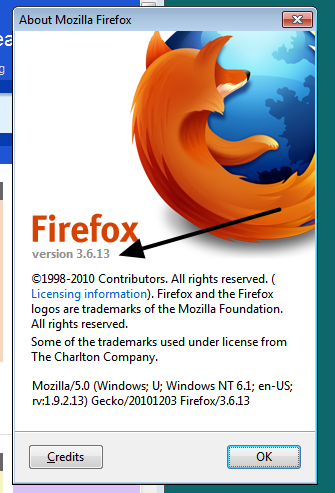
Look here to determine the current version of Firefox.
To check for updates and download if available, open Firefox
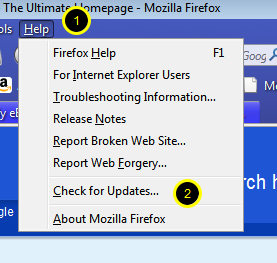
Then click on Help (1), then Check for Updates (2)
Checking for Updates
Firefox will check for updates. If any are available, they will be downloaded and installed automatically. After Firefox has installed the updates, it will restart. After it restarts, rerun the above step to verify that the version number has changed and that the update was successful.
Subscribe to:
Posts (Atom)