Saturday, January 15, 2011

Network printing problem solved

How I solved the network printer problem between the Dell XPS laptop and the Dell One Desktop.

The Situation:
I have a Brother HL-2140 b/w laser printer attached to a Dell One desktop via a USB cable. The printer works fine from the Dell One. I have a home network that works fine. I want to be able to print from my Dell XPS laptop to the Brother printer via my wireless network.

The Problem:
Every time I shut down and restarted the XPS, I could not print to the Brother HL2140 printer

If I reinstalled the network printer in the normal manner, I could print.

How I solved the problem:
  1. Rebooted the XPS laptop
  2. Tried to print a test page, but it would not print
  3. I then exported the services.msc file as a CSV file BEFORE reinstalling the printer.
  4. Next, I reinstalled the network printer and tried to print a test page. Two test pages were printed: the first attempt and the second attempt printed.
  5. I then exported the services.msc file as a CSV file AFTER reinstalling eh printer.
  6. I printed both files that I exported.
  7. I then compared both files to see the difference.

The only difference was one line item on the AFTER file that was NOT on the BEFORE file.
The line item name was:
Diagnostic System Host.

When I opened the Services file AFTER reinstalling the network printer, this line item was set to Manual. I changed it to Automatic, saved the file and rebooted the XPS.

Then I tried to print a test page and I was successful

Saturday, January 8, 2011

How to copy one or more photos to Dropbox.

This lesson will explain how to copy one or more photos from a Windows PC to your Dropbox. It assumes you already have a Dropbox account. If not, go to www.dropbox.com and sign up for a free account. This lesson further assumes you are copying photos from your Pictures folder on the Windows computer.

To copy one photo from Pictures folder to Dropbox folder

media_1294302336105.png

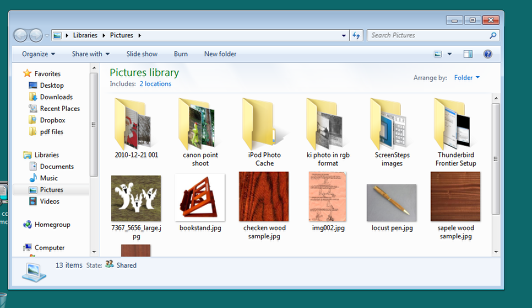
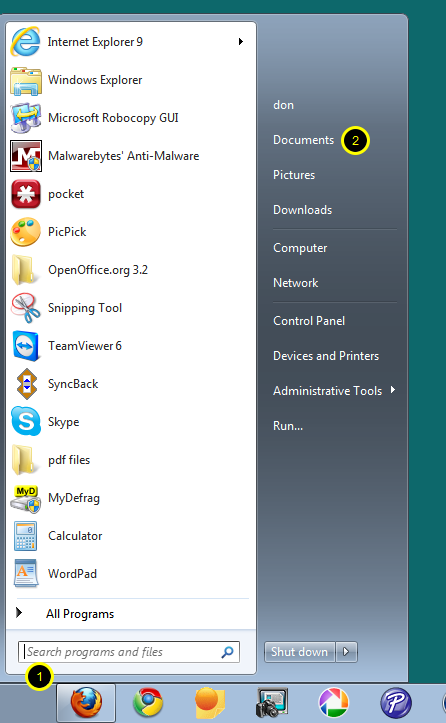
Open your Pictures folder by clicking on Start (1) then Pictures (2)

Your Pictures folder will open

media_1294302377128.png

Now, let's open your Dropbox folder

media_1294302454710.png

To open Dropbox folder, click on Start (1), then click on Documents (2)

Your Documents window will open as shown below

media_1294302493907.png

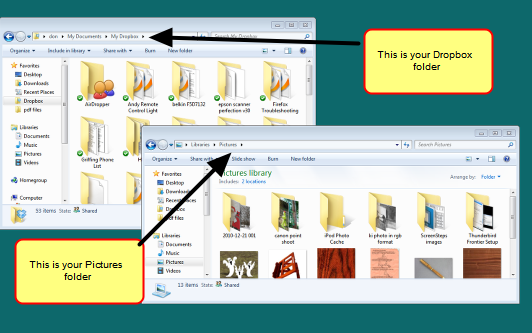
To open your Dropbox folder, left click on "Dropbox" in the upper left section of the Documents window

Now both your Pictures window and your Dropbox window will be on your Desktop

media_1294303284525.png

To copy one photo at a time

Now with both Windows on your Desktop, point your mouse to a photo in your Pictures folder that you want to copy to Dropbox, then right click and then left click on "Copy" from the drop down menu.
Now, point your mouse to the Dropbox folder and right click and then left click on "Paste" from the drop down menu.
You have just copied one photo to your Dropbox folder.

To copy multiple photos from your Pictures folder to your Dropbox folder

keyboard.png

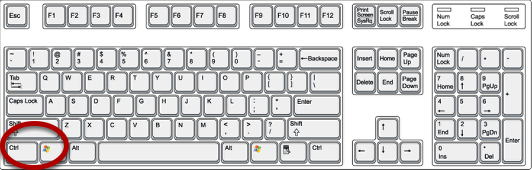
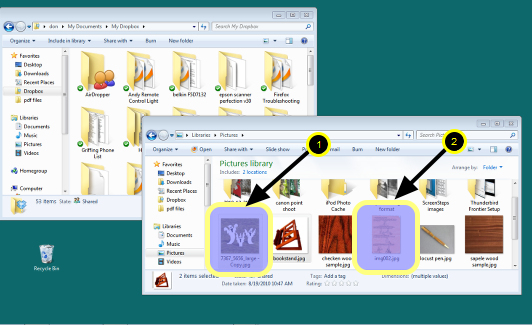
While holding down the "Ctrl" key, point your mouse to each photo in your Pictures folder that you want to copy to your Dropbox folder.

Clicking on multiple photos

media_1294304292420.png

While holding down "Ctrl" key, left click on first photo (1), then second photo (2). If you want to copy more phots, simply continue left clicking on more photos, while still holding down the "Ctrl" key.
Now, release the "Ctrl" key and point your mouse to any one of the multiple photos selected and right click and then left click on "Copy" from the drop down menu.

Now point your mouse to your Dropbox folder, then right click and then left click on "Paste" from the drop down menu.

You have now copied multiple photos to your Dropbox folder

Wednesday, December 22, 2010

Setting up a Remote Connection

Set up remote computer for using Team Viewer

Visit Team Viewer Website

media_1292925333849.png
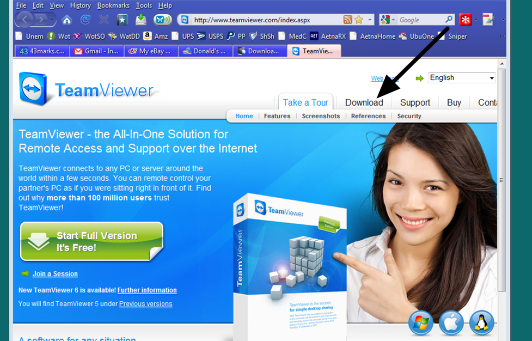
Open Firefox and enter www.teamviewer.com in the address bar as shown above; then press the Enter key.

Now you will be at the Team Viewer website

media_1292925561597.png
Click on Download link as indicated by the arrow.

After clicking on "Download" you will be at this page.

media_1293007093277.png
Move down this page until you get to the following screen

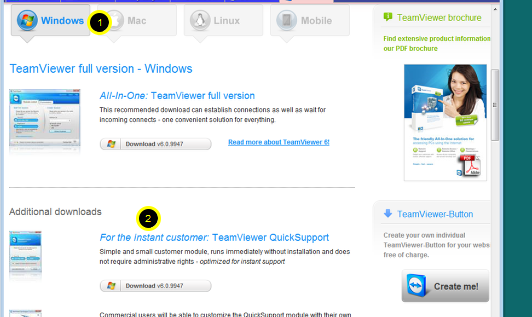
Mouse down the page until it arrive at this section of the page

media_1292925698603.png
Make sure that "Windows" tab is selected (1). Then click on the link "for the instant customer TeamViewer Ouick Support" (2)

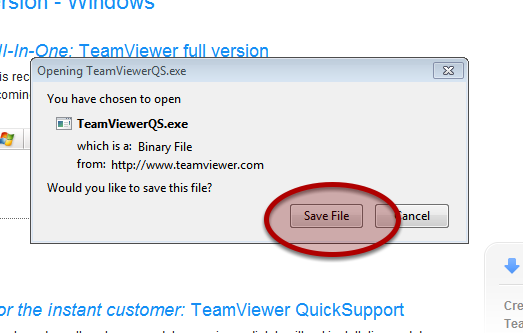
This window will appear next.

media_1292925734735.png
Click on the Save File button

Firefox Downloads window will appear

media_1292925978468.png
Wait for the download to complete. The first entry should be "TeamViewerQS.exe". You may have several entries in this downloads window.
Double click on the TeamViewerQS.exe line as shown above.

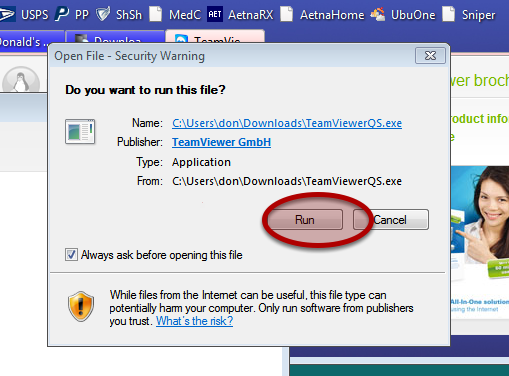
After double clicking above, this window will appear

media_1292926013597.png
Click on "Run"

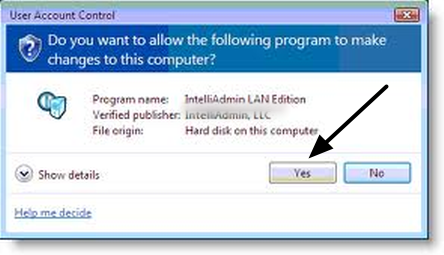
Windows security window may appear. If it does not appear, skip to the next step.

windows_7_uac_image.png
If this window appears, click on "Yes" to continue. If it does not appear, you should be at the next step.

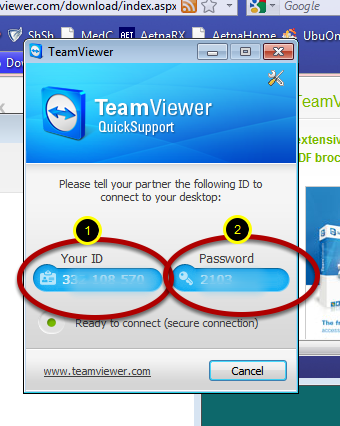
After the program installs, this Team Viewer Quick Support window will appear.

media_1292926056217.png
In order for me to connect to your computer, I need both the "Your ID" number (1) and the "Password" number (2). These can be emailed to me or you can phone me with the information

Updating Firefox

How to check version and download new version of Firefox

Open Firefox

media_1292839936734.png
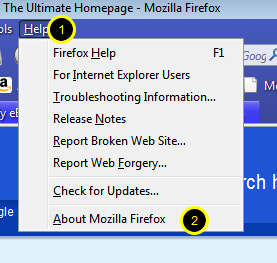
Click on Help (1). Then Click on About Mozilla Firefox (2)

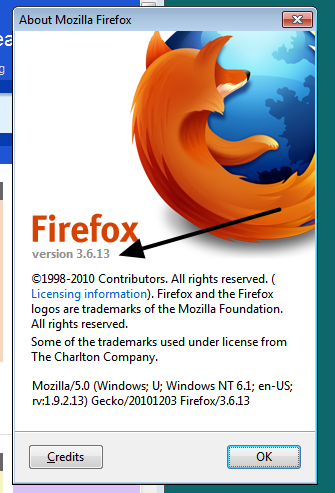
This will be the next window that appears

media_1292840179159.png
Look here to determine the current version of Firefox.

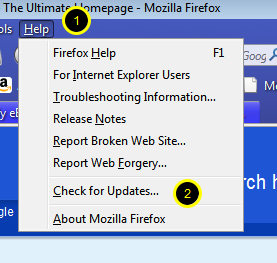
To check for updates and download if available, open Firefox

media_1292840522928.png
Then click on Help (1), then Check for Updates (2)

Checking for Updates

Firefox will check for updates. If any are available, they will be downloaded and installed automatically. After Firefox has installed the updates, it will restart. After it restarts, rerun the above step to verify that the version number has changed and that the update was successful.

Running Microsoft Malicious Software Removal Tool

On the second Tuesday of every month, Microsoft issues security updates for Windows. These are automatically downloaded and installed by default. In connection with this monthly security update, Microsoft runs a program known as "Malicious Software Removal Tool. It is run in "quick Mode", but there is a "Full Mode" which you can run any time. The following instructions explain how to run this tool.

Run Malicious Removal Tool

media_1292751337480.png
Click on Start Orb (1). Then type "mrt" in search box (2). Then click on "mrt" under Programs (3). Click YES on the warning message

This window will appear.

media_1292751670215.png
Click on the "Next" button

This window will appear next

media_1292751714315.png
Click on the radio button next to Full scan. (1). then click on "Next" (2)

This window will appear and the full scan will start.

media_1292752017260.png
Just let it run and read the results. Hopefully, there will be no infected files